Creating a new project
Since we already installed angular-cli in the previous blog, lets create a new project called ng2-2 using "ng new" command. Let us also cd into the newly created project directory..ng new ng2-2 cd ng2-2
This creates the new project.
Installing bootstrap
First step is to install bootstrap. We will install angular2 compliant bootstrap version called ng2-bootstrap. ng2-bootstrap utilizes the new Angular2 concepts to provide a Typescript based bootstrap library. Importantly it does not directly access the DOM.This step requires the following commands to be run from within the ng2 folder on the command line.. Please note that we are deploying an alpha version of the bootstrap 4 library. Needless to say, it will have to be updated with the latest versions as they are released.
npm install --save bootstrap@4.0.0-alpha.5
npm install --save @ng-bootstrap/ng-bootstrap
Results will be similar to screen below

Making ng2-bootstrap available to the project
To make the newly added ng2-bootstrap library available to the entire project, we need to add it to the app.module.ts file.. We add the following the two lines to our file
The following content shows these two lines added to my app.module.ts file
import {NgbModule} from '@ng-bootstrap/ng-bootstrap';

imports: [
    NgbModule.forRoot(), ...
  ],
The following content shows these two lines added to my app.module.ts file
import { BrowserModule } from '@angular/platform-browser';
import { NgModule } from '@angular/core';
import { FormsModule } from '@angular/forms';
import { HttpModule } from '@angular/http';
import {NgbModule} from '@ng-bootstrap/ng-bootstrap';
import { AppComponent } from './app.component';
import { LikesComponent } from './likes/likes.component';

@NgModule({
  declarations: [
    AppComponent,
    LikesComponent
  ],
  imports: [
    BrowserModule,
    FormsModule,
    HttpModule,
    NgbModule.forRoot()
  ],
  providers: [],
  bootstrap: [AppComponent]
})
export class AppModule { }
It looks as follows in my editor

Creating a new component
At this step, we will create a new component within our project called "likes". This is the component that will be used within our example. To create a new component using angular-cli, we just need to type the command ng generate componentng generate component likes
This generated the component in our project, and we can open the project in vscode (or your preferred IDE). In my vscode, the newly created project with the new component looks like the following:

In the next steps, we will make changes to the generated files to try two way binding in Angular2 as well as bootstrap components provided by ng-bootstrap.
Overall logic
Overall logic is fairly straightforward. We want to use the a rating component in our test. We want the component to be initialized based on a value in our business logic. When the user changes the values on the ratings, we want the component's internal value to be updated.We would like to use angular2 two way binding. Angular2 provides an event and a property binding that would suffice to implement two-way binding. However, Angular2 also provides a short-hand way of implementing two-way binding. In this post, we shall try both. As we shall see separating the event binding also allows us to add additional behaviour. Here is the final screen..
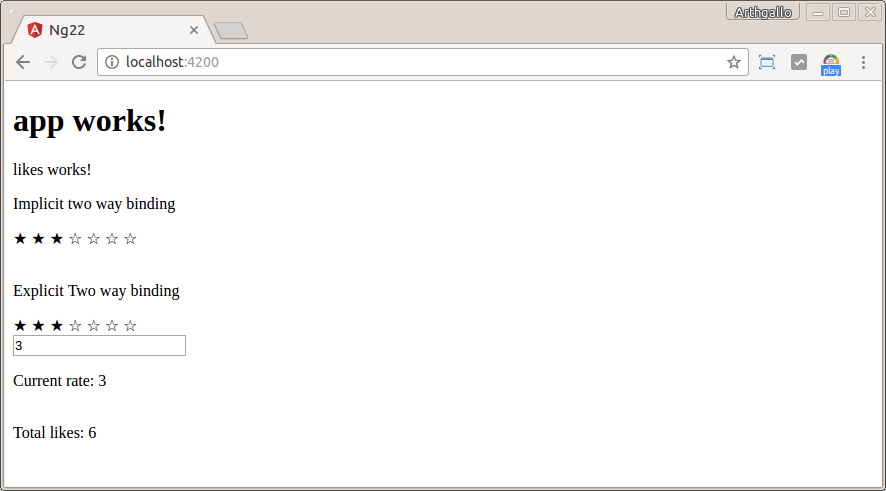
Let us first start with the component's presentation logic
Component Presentation logic
The component presentation logic requires changes to ./app/likes/likes.component.html. Here we want the following items displayed on the page..- A label for implicit two way binding in Angular2
- The ngb-rating component configured using Angular's shorthand two-way binding approach. Notice the square and regular brackets around the rate property of the rating component. In html components where two-way binding has not been built in, another way to implement implicit two way binding is to use [(ngModel)] directive. The ngb-rating component also contains a max property that controls number of stars displayed
- Another ngb-rating component configured using a separate property and event binding, called through the onRate method in the component class. This allows us to program additional behaviour
- An input text box that also implements explicit two way binding. Its value gets updated from the component, and any changed value updates the component as well using the updateRating() method in the component class. The implicit way to implement two-way binding would be to use the [(ngModel)] directive mentioned earlier.
- A label showing number of ratings selected through the value of the ratings property.
- A label for Total likes
<p>
  likes works!
</p>
<p>Implicit two way binding</p>
<ngb-rating [max]="maxStars" [(rate)]="ratings">
</ngb-rating>
<p> Explicit Two way binding</p>
<br/>
<ngb-rating [max]="maxStars" [rate]="ratings" (rateChange)="onRate($event)">
</ngb-rating>
<br/>
<input type="text" [value]="ratings" (change)="updateRating($event)">
<br/>
<p> Current rate: {{ratings}}</p>
<br/>
<span>Total likes: {{totalLikes}} </span>
Here is how the same code looks on my vscode screen.

The application logic
The application logic is also straightforward- Our component decorator selects the "likes" tag and inserts our component's presentation code specified in the previous step within likes.component.html
- We declare 3 component level properties for totalLikes, ratings and maxStars, each initialized appropriately
- An updateRating() method, called when the text box is updated, updates the ratings property with the value entered in the text box.
- An onRate() method, sets the value of the ratings property based on value selected in the second component.
import { Component, OnInit, Input } from '@angular/core';

@Component({
  selector: 'likes',
  templateUrl: './likes.component.html',
  styleUrls: ['./likes.component.css']
})
export class LikesComponent implements OnInit {

@Input() totalLikes = 6;
@Input() ratings = 4;
@Input() maxStars = 7;

  constructor() { }

  ngOnInit() {
  }

  onClick(){
  }

  updateRating($event) {
    this.ratings = $event.target.value;
  }

  onRate(value) {
    console.log("Rate changed to " + value);
    this.ratings = value;
   }
}
This is how it looks on my vscode screen

Putting it together
To put it together, we just need to update our app.component.ts to add the Likes command..<h1> {{title}} </h1> <likes></likes>
On my vscode screen

The behaviour
The behaviour is straightforward- The page loads with the default settings for the page


3. Now we click the second component and bring the value down to 2.

4. Finally, we edit the value in the text box and that should update values for all components as well.

I am sure more creative ways can be conjured to demonstrate the same, but this should explain how the two way binding works with Angular2 and bootstrap.


