Search This Blog

Showing posts with label Pseudo distributed mode. Show all posts

Saturday, July 25, 2015

Installing RHadoop on Ubuntu

In this post, we will install and configure RHadoop on Ubuntu. RHadoop is essentially R modules that can interact with a Hadoop environment and can issue map reduce commands. Pre-requisites to this of course are R and Hadoop.

1. Installing Hadoop - If you don't have Hadoop installed on your machine, you can follow the steps listed in my post to set up a pseudo-distributed cluster on a single machine. You will also need to make sure HBase is setup on your machine to utilize hdfs. This post walks through steps to set up HBase in a pseudo distributed mode utilizing hdfs.


2. Installing R - If you don't already have R set up on your machine, you can follow steps in this post to set R up.

or

3. Upgrading R - If you don't have the latest version of R on your machine, it may be a good idea to upgrade it by following these steps.

Next we set up RHadoop. Overall steps are as follows..

1. Configuring R shell environment to access Hadoop
2. Configuring R library paths
3. Installing R libraries

We will go these steps in the following post.

1. Configuring R shell environment to access Hadoop

The first step is to add some configuration to the bashrc environment.

Lets open the configuration file.

$ sudo ~/.bashrc


Next, add the following lines to the end of the  file

export HADOOP_PREFIX=$HADOOP_HOME
export HADOOP_CMD=$HADOOP_HOME/bin/hadoop
export HADOOP_STREAMING=$HADOOP_HOME/share/hadoop/tools/lib/hadoop-streaming-2.7.1.jar


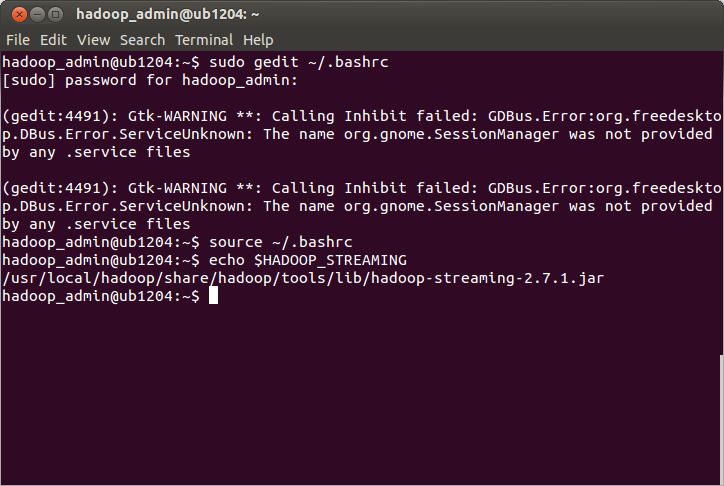
Next step is to apply these environment settings and see if the environment variables have been setup

$ source ~/.bashrc
$ echo $HADOOP_STREAMING


2. Configuring R library paths

Next step is to make sure that the library path is setup correctly, so that any installed packages will be available to all users. Start R and enter the following command

$ sudo R
> .libPaths()

Make sure the paths point to /usr/local or similar, else re-configure the paths to point to these folders, by setting a destination path in the install command. On my machine, I did not have to change anything.


Next, we need to download the needed packages from the RHadoop site.

I created a folder called rhadoop on my local account and downloaded the following packages from github using the wget command

wget http://cran.r-project.org/src/contrib/rJava_0.9-6.tar.gz
wget https://github.com/RevolutionAnalytics/rmr2/releases/download/3.3.1/rmr2_3.3.1.tar.gz
wget https://github.com/RevolutionAnalytics/rhdfs/blob/master/build/rhdfs_1.0.8.tar.gz?raw=true
wget https://github.com/RevolutionAnalytics/rhbase/blob/master/build/rhbase_1.2.1.tar.gz?raw=true
wget https://github.com/RevolutionAnalytics/ravro/blob/1.0.4/build/ravro_1.0.4.tar.gz?raw=true
wget https://github.com/RevolutionAnalytics/plyrmr/releases/download/0.6.0/plyrmr_0.6.0.tar.gz
mv rhdfs_1.0.8.tar.gz\?raw\=true rhdfs_1.0.8.tar.gz
mv rhbase_1.2.1.tar.gz\?raw\=true rhbase_1.2.1.tar.gz
mv ravro_1.0.4.tar.gz\?raw\=true ravro_1.0.4.tar.gz


Next we need to update the JDK 

$ sudo R CMD javareconf


Next, we will install rJava package that we downloaded

$ sudo R

install.packages("~/rhadoop/rJava_0.9-6.tar.gz", repos=NULL, type="source")

Next step is to install some pre-requisite R packages

> install.packages(c("Rcpp", "RJSONIO", "bitops", "digest", "functional", "stringr", "plyr", "reshape2", "dplyr", "R.methodsS3", "caTools", "Hmisc"))


Next, we install data.table package for handling large datasets.

> install.packages("data.table")


We need to make sure that you have thrift installed on your machine. If you don't have follow these steps in my post to install thrift on your Ubuntu machine to install thrift. It was thrift installation that posed the biggest challenges for me.

Next we will deploy these packages in R. Enter the following commands on the R command prompt.

Sys.setenv("HADOOP_CMD"="/usr/local/hadoop/bin/hadoop")

install.packages("~/rhadoop/rmr2_3.3.1.tar.gz", repos=NULL, type="source")
install.packages("~/rhadoop/rhdfs_1.0.8.tar.gz", repos=NULL, type="source")
install.packages("~/rhadoop/plyrmr_0.6.0.tar.gz", repos=NULL, type="source")
install.packages("~/rhadoop/rhbase_1.2.1.tar.gz", repos=NULL, type="source")
install.packages("~/rhadoop/ravro_1.0.4.tar.gz", repos=NULL, type="source")


That's it rhadoop is installed. To make sure everything is working, start R in normal mode and issue the following commands

> Sys.setenv("HADOOP_CMD"="/usr/local/hadoop/bin/hadoop")
> library(rmr2)
> library(rhdfs)
> hdfs.init()


Now the R environment is ready to use the HDFS environment.


Installing HBase on pseudo-distributed mode

In this post, we will install HBase in a pseudo-distributed mode on Ubuntu. In a previous post, we setup Hadoop (HDFS) in a pseudo distributed mode.

To get started, first lets get the latest version of HBase from http://hbase.apache.org/


Next we download the hbase distribution to our local file system and extract the contents..

I downloaded hbase 1.1.0.1 from the Apache mirror and saved it my local folder. To extract the tar file use the following command...

$ tar -xzvf hbase-1.1.0.1-bin.tar.gz


After extracting the contents, we need to make some configuration changes. We start by opening the following file.

$ cd hbase-1.1.0.1
$ cd conf
$ sudo gedit hbase-site.xml

You will see a near empty file with an empty configuration XML node. Enter following configuration for hbase root directory as well as the zookeeper process.

<configuration>
  <property>
    <name>hbase.rootdir</name>
    <value>file:///home/arthgallo/hbase</value>
  </property>
  <property>
    <name>hbase.zookeeper.property.dataDir</name>
    <value>/home/arthgallo/zookeeper</value>
  </property>
</configuration>

Here is a screenshot of the updated file.


Next we need to make sure JAVA_HOME is set properly. Open the environment file to set it

$  sudo gedit /usr/local/hbase/conf/hbase-env.sh

Uncomment the JAVA_HOME line and point it to the path where JDK is installed. In case you have trouble determining the best way to set up JAVA_HOME, refer to this post for how to do so.

This entry to be made in the hbase-env file is shown as below


Now in the terminal shell cd to the folder where HBase was extracted.

$ cd ~/Work/Servers/HBase/hbase-1.1.0.1
$ cd bin
$ ./start-hbase.sh


Now enter jps to make sure that HBase started correctly.

$ jps

We can see the Master processes, to tell us that jps started correctly.


Next we will connect to the HBase instance and run a few commands to make sure everything is working correctly.

In the bin folder, enter the following command

$ ./hbase shell


This will connect to the HBase shell client. Enter the following commands on the hbase shell to make sure everything is working correctly.

> create 'test', 'cf'
> list 'test'
> put 'test', 'row1', 'cf:a', 'value1'
> put 'test', 'row2', 'cf:b', 'value2'
> put 'test', 'row3', 'cf:c', 'value3'
> scan 'test'


Now that we have verified that everything is working, it is time to clean up and switch to the pseudo-distributed mode.

Enter the following commands on the hbase shell prompt

> disable 'test'
> drop 'test'
> quit


Next step is to stop hbase

$ ./stop-hbase.sh


Next we need to edit the hbase configuration file to run it in the pseduo distributed mode

Edit the hbase conf file, and make the following entries

<configuration>
  <property>
    <name>hbase.cluster.distributed</name>
    <value>true</value>
  </property>
  <property>
    <name>hbase.rootdir</name>
    <value>hdfs://localhost:9000/hbase</value>
  </property>
  <property>
    <name>hbase.zookeeper.property.dataDir</name>
    <value>/usr/local/zookeeper</value>
  </property>
</configuration>


Save the file and close it.

Make sure the zookeeper folder is created and the zookeeper and hbase directories are accessible to the user.

$ mkdir /usr/local/zookeeper
$ sudo chown -R hadoop_admin /usr/local/zookeeper
$ sudo chown -R hadoop_admin /usr/local/hbase


Make sure HDFS (Hadoop Distributed File System) is installed and running. To check if HDFS is running enter the following command on the terminal window

$ hdfs dfsadmin -report

It will show a report as follows


 run the command to start hbase


Once it is started, you should see the following


Run jps command to see the running processes

$ jps


Next we can again open a new terminal to start hbase shell, and run the same commands again

> create 'test', 'cf'
> list 'test'
> put 'test', 'row1', 'cf:a', 'value1'
> put 'test', 'row2', 'cf:b', 'value1'
> put 'test', 'row3', 'cf:c', 'value3'
> scan 'test'

We can see if everything executed correctly.


That's it folks hbase is set up correctly.

Also, if you have set up thrift on your machine you can start the hbase thrift server with the following command

$ /usr/local/hbase/bin/hbase-daemon.sh start thrift