In my previous post, we had seen how
to create the Date Dimension table using Pentaho Data Integration
(Kettle). In this post, we will see how to create a Time
dimension in Kettle.
It is recommended that Time dimension
be a separate dimension from the Date. In that spirit, I created the
following transformation in Kettle. It contains the following 10 steps.
1. Launch Kettle
2. Generate Rows for processing and setup variables
3. Convert Date to Epoch Time
4. Create sequence for incrementing time in milliseconds
5. Create sequence for incrementing identifier
6. Increment time and identifier with newly created sequences
7. Convert time in milliseconds back to Date
8. Output contents to a text file
9. Extract time out of the incremented date
Step 1: Launch Kettle
Launch Pentaho Data Integration (Kettle
or GeoKettle) on your local machine. Create a new transformation by
clicking on File > New Transformation.
Step 2: Generate Rows for processing and setup variables
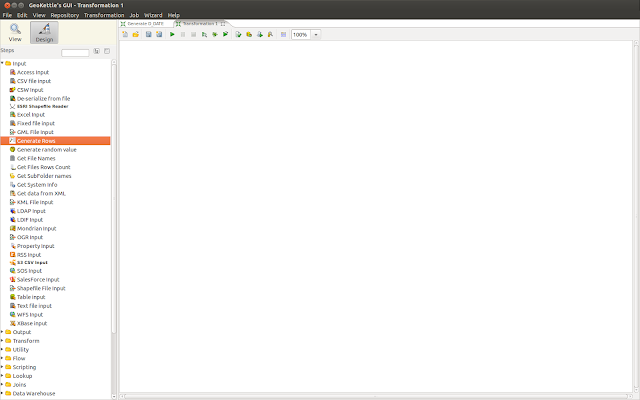
Make sure you are in design mode.
Expand the Input section on Steps menu on the side and navigate to
Generate Rows step.
Drag the Generate Rows step across to
the work area as shown below, and drop it in the work area.
|
|
|
Right click on the Generate Rows step
and enter the following information
- Step Name: Generate Rows
- Limit : 1440
In the fields column, add the following
field
- Name: START_TIME
- Type: Integer
- Format: ####
- Value: 0000
Click on the row to add a second field.
Add the following parameters for this field
- Name: REAL_TIME
- Type: Date
- Format: yyyy/MM/dd HH:mm:ss
- Value: 1970/01/01 00:00:00
Step 3: Convert Date to Epoch Time
Next add “Select Values” from the
Transform section of the Design tab. Select Values control allows us
to change and modify the datatype of any variable in the flow. After
dropping the step in the workspace, connect it to the preceding step
using a hop as shown in the adjacent figure.
|
|
|
Now Edit the step to enter the
following configuration information to convert Real time to an
Integer. Doing so, converts the time to its Epoch time in
milliseconds. To do so, we enter the following information.
- Fieldname: REAL_TIME
- Type: Integer
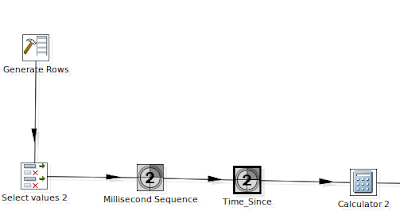
Step 4: Create sequence for incrementing time in milliseconds
Next we add a Sequence to our flow, and
connect it to the preceding step as shown in the screenshots below.
The sequence will increment our time in milliseconds derived in the
previous step, by one minute intervals.
|
|
|
Edit the step in the transformation to
enter the following information.
- Step name: Millisecond Sequence
- Name of value: MS_Increment
- Use counter to calculate sequence:
- Start at value: 0
- Increment by: 60000
- Maximum value: 86400000
Click OK to continue.
Step 5: Create sequence for incrementing identifier
Now add another sequence to the
transformation as shown below and connect it to the preceding hop as
shown below.
We can enter the following
configuration for the newly added sequence.
- Step name: Time_Since
- Name of value: Time_Since
- Use counter to calculate sequence:
- Start at value: 0
- Increment by: 1
- Maximum value: 1440
Step 6: Increment time and identifier with newly created sequences
Next, we need to add a calculator to
the flow.
|
|
|
We need to configure the calculator by
adding two calculations. First calculation adds the numeric sequence
to our identifier, and second sequence adds Millisecond increments to
our time.
For the first field, enter the
following details.
New field: INC_TIME
Calculation: A+B
Calculation: A+B
Field A: INC_TIME
Field B: Time_Since
Remove: N
For the next field, add the following
parameters.
New field: CALC_TIME
Calculation: A+B
Field A: REAL_TIME
Field B: MS_Increment
Value type: Integer
Remove: N
Here is how the dialog box looks on my
screen.
Click OK to continue.
Step 7: Convert time in milliseconds back to Date
Next step is to convert the calculated
time from integer back to Date. To do this, we add another Select
Values step to our transformation.
Make the following configuration
changes in the newly added step.
Fieldname: CALC_TIME
Type: Date
Binary to Normal?: N
Format: yyyy/MM/dd HH:mm:ss
Click OK to continue
Step 8: Output contents to a text file
The final step is to output the
contents to a text file
For this we add a “File Text Output”
step to our transformation.
The Text File Output step, as the name
suggests outputs the results to a text file.
Edit the “Text File Ouput” step,
and make the following changes.
On the File tab, set the name of the
output file. I have set it to simply “log” and the Extension to
txt. This will create a file called log.txt in the output folder.
Step 9: Extract time out of the incremented date
Before clicking OK, switch to the
Fields tab, and make the following entries.
Retain the following two fields.
- Field 1 details are as follows
- Name: Time_Since
- Type: Integer
- Precision: 0
- Field 2 details are as follows
- Name: CALC_TIME
- Type: Date
- Format: HH:mm:ss
The following screenshot shows these
changes as on my screen.
Click Ok.
Step 10: Save and Test the Transformation
Save the transformation using the floppy icon on toolbar or File > Save on drop down menu.
Now, we need to run it using the Launch
button.
Clicking this button launches the
following screen.
Click the Launch button and the
transformation starts executing.
The Execution Results window shows the
results in a bottom pane.
Opening the log file, we can see the
following results.
That's it, we are done.


