Search This Blog

Saturday, May 18, 2013

Installing GeoMondrian Workbench


In a previous post, I had installed GeoMondrian on my machine. Accessing the GeoMondrian homepage at (http://localhost:8080/geomondrian) from the installation we can see the link for downloading GeoMondrian workbench.


Accesing the link takes you to the sourceforge site hosting the tools. The website is http://sourceforge.net/projects/geomondrian/files/


Once you download the files, you can unzip the contents in your folder. On my machine the unzipped contents look like this.


Opening a terminal window and executing workbench.sh launches the application.


The launched application looks like this.


Now, we can start playing with our workbench installation.


Friday, May 17, 2013

Loading Shape file data into PostGIS

In this post, we are going to load some shape file data into PostGIS. Loading Shape file data into PostGIS involves two steps. These are:

1. Convert Shape file to SQL Insert statements
2. Execute the SQL Insert statements on a PostGIS instance.

Let us start with the first step.

PostGIS ships with a tool for converting shape files to SQL insert scripts for PostGIS called shp2pgsql described below.

shp2pgsql

As the name suggests, shp2pgsql converts shape files into PostGIS compatible SQL Insert scripts. The tool itself is deployed in a sub-folder called “loader” in the primary installation folder. It should get built when the primary PostGIS tool is built on your machine as part of your installation as described in my previous post on downloading and installing PostGIS.

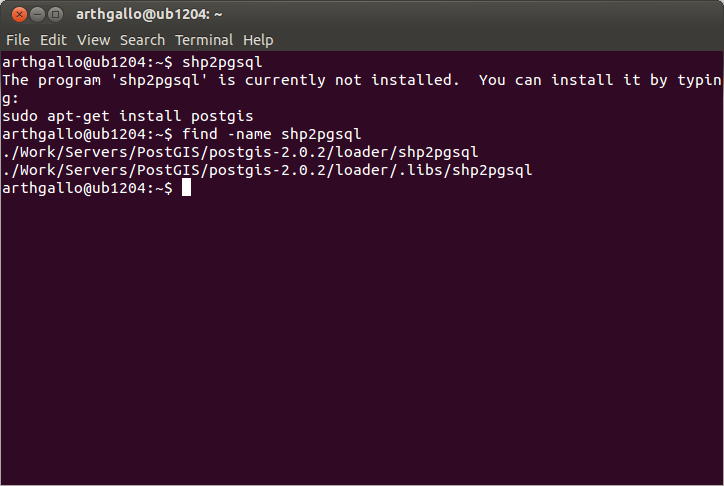
Opening a terminal window and running the shp2pgsql command should display all the runtime options and switches.


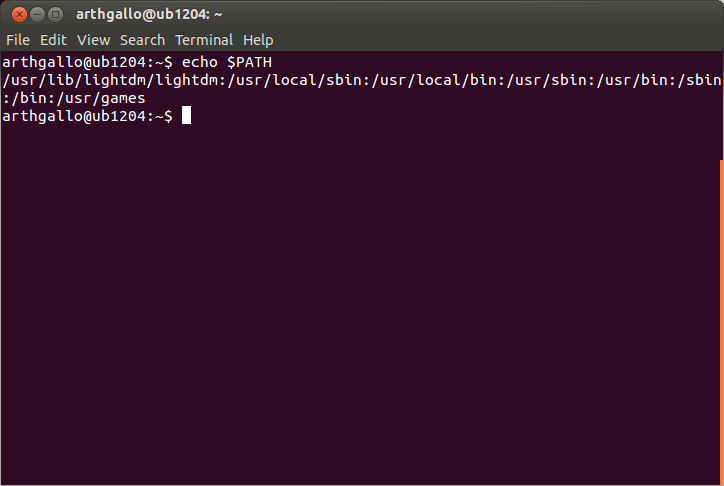
If you are not shown the above options, it may be that shp2pgsql is not in your path. Adding shp2pgsql (or any other command) to your path is easy as described in my post on the topic.


Let us start with an example with some real data. I am using certain publicly available datasets from New York Dept of Transportation for this exercise.

Obtaining and Loading data into PostGIS

The data consists of the following data obtained from following public sources.


IDNameFormatURL
1AADTShape file formathttps://www.dot.ny.gov/divisions/engineering/applications/traffic-data-viewer/traffic-data-viewer-repository/2010_AADT_Line.zip


2AADT Short CountShape File Formathttps://www.dot.ny.gov/divisions/engieering/applications/traffic-data-viewer/traffic-data-viewer-repository/2010_Short_Count.zip


3AADT Continuous CountShape File Formathttps://www.dot.ny.gov/divisions/engineering/applications/traffic-data-viewer/traffic-data-viewer-repository/2010_Continuous_Count.zip


4Station Locations 2010Excelhttps://www.dot.ny.gov/divisions/engineering/applications/traffic-data-viewer/traffic-data-viewer-repository/Station_Locations_2010.xls


5NYS Milepoint Referencing SystemShape File Formathttp://gis.ny.gov/gisdata/fileserver/?DSID=1111&file=DOT_MilepointRoute.zip


6FHWA Urban Areas 2000Shape File Formathttp://gis.ny.gov/gisdata/fileserver/?DSID=1105&file=fhwa2000.zip


7County BoundariesShape File Formathttp://gis.ny.gov/gisdata/fileserver/?DSID=910&file=nyshore.zip


I proceeded to download these files from their respective locations. Once we have downloaded all the datasets, we need to extract these files for loading on PostGIS. To achieve this I created a small script that looks as follows:

extract_GISData.sh


mkdir ../Data/GISData
unzip -o 2010_AADT_Line.zip -d ../Data/GISData
unzip -o 2010_Short_Count.zip -d ../Data/GISData
unzip -o fhwa2000.zip -d ../Data/GISData
unzip -o nyshore.zip -d ../Data/GISData
unzip -o 2010_Continuous_Count.zip -d ../Data/GISData
unzip -o DOT_MilepointRoute.zip -d ../Data/GISData
unzip -o nyintch.zip -d ../Data/GISData

My final script looks as below...


Now we need to upload these extracted shape files to PostGIS. 

To execute this file, we need to make the file executable and open a terminal window to execute it using the following commands.

$ chmod a+x *.sh
$ ./extract_GISData.sh

In the following screenshot, we can see the script running on my machine.


Next we need to load the extracted shape file data into the PostGIS database using the shp2pgsql utility. Let us create a script that will process each individual file separately and create the insert scripts from each shape file.
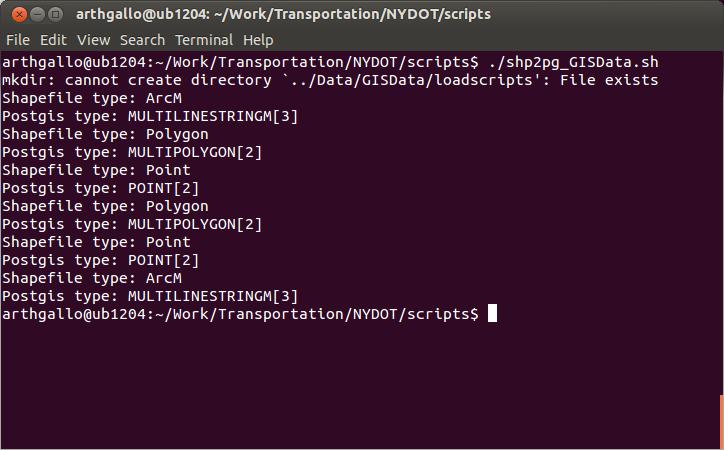
shp2pg_GISData.sh


rmdir --ignore-fail-on-non-empty ../Data/GISData/loadscripts
mkdir ../Data/GISData/loadscripts
shp2pgsql -s 26918 -d -I -g geom ../Data/GISData/2010_AADT.shp nystaging.2010_AADT> ../Data/GISData/loadscripts/insert_2010_AADT.sql
shp2pgsql -s 26918 -d -I -g geom ../Data/GISData/counties.shp nystaging.counties> ../Data/GISData/loadscripts/insert_counties.sql
shp2pgsql -s 26918 -d -I -g geom ../Data/GISData/2010_Continuous_Count.shp nystaging.2010_Continuous_Count > ../Data/GISData/loadscripts/insert_2010_Continuous_Count.sql
shp2pgsql -s 26918 -d -I -g geom ../Data/GISData/FHWAUrbanAreas2000.shp nystaging.FHWAUrbanAreas2000> ../Data/GISData/loadscripts/insert_FHWAUrbanAreas2000.sql
shp2pgsql -s 26918 -d -I -g geom ../Data/GISData/2010_Short_Counts.shp nystaging.2010_Short_Counts> ../Data/GISData/loadscripts/insert_2010_Short_Counts.sql

shp2pgsql -s 26918 -d -I -g geom ../Data/GISData/MilepointRoute.shp nystaging.Milepointroute> ../Data/GISData/loadscripts/insert_MilepointRoute.sql

In the above script, -d option will dump the original table and recreate it. Option -I will create a spatial index on the geometric column where as -g specifies the name of the geometric column.
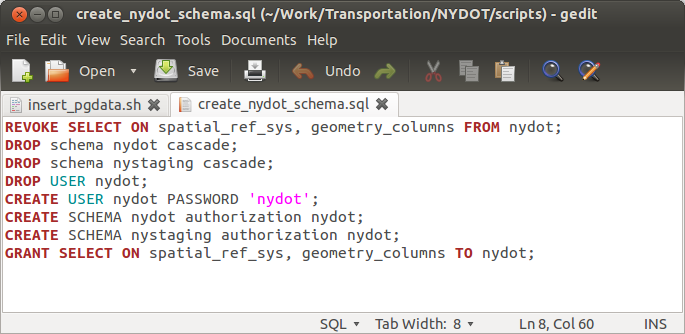
Here is my script in the gedit editor.


Now we will save the file and execute it. To make the file executable, we need to run the command chmod

$ chmod a+x *.sh
$ ./shp2pg_GISData.sh


Now that the files have been created, we can upload them to PostGIS. We are of course going to use the psql command for uploading the insert scripts. Here are the command line switches to the psql command.


I first needed to create a schema in a pre-existing database. To do so, I created a script that looks like as follows.

create_nydot_schema.sql

REVOKE SELECT ON spatial_ref_sys, geometry_columns FROM nydot; 
DROP schema nydot cascade;
DROP schema nystaging cascade; 
DROP USER nydot; 
CREATE USER nydot PASSWORD 'nydot'; 
CREATE SCHEMA nydot authorization nydot; 
CREATE SCHEMA nystaging authorization nydot; 
GRANT SELECT ON spatial_ref_sys, geometry_columns TO nydot;


Then, to execute I needed to run it as user postgres. Here are the commands for logging in as user postgres and executing the script:

$ su – postgres
postgres$ psql -d nywarehouse -f /home/arthgallo/Work/Transportation/NYDOT/scripts/create_nydot_schema.sql


Now we are ready to execute the insertion scripts on PostGIS. We need to create a file that will execute each if the insert scripts generated at previous steps. As most may know, psql does not allow supplying passwords in the command line. It has to be set in the environment variables. This post describes how to set the password in .pgpass file on Ubuntu/ Linux environment.


Also, I want to load the spatial data into the staging schema instead of the primary warehouse schema first. To do so, I need to specify the staging schema in the command line input parameters. This is not a standard capability in the psql command line options, however, it is very easy to do so, as described in my post on specifying schema in the command line psql parameters.

Here is the complete script for loading the files.

insert_pgdata.sh

rm ../Data/GISData/loadscripts/*.log
psql -U nydot -d nywarehouse -v schema=nystaging,public -f ../Data/GISData/loadscripts/insert_2010_AADT.sql -L ../Data/GISData/loadscripts/insert_2010_AADT.log 
psql -U nydot -d nywarehouse -v schema=nystaging,public -f ../Data/GISData/loadscripts/insert_2010_Continuous_Count.sql -L ../Data/GISData/loadscripts/insert_2010_Continuous_Count.log 
psql -U nydot -d nywarehouse -v schema=nystaging,public -f ../Data/GISData/loadscripts/insert_2010_Short_Counts.sql -L ../Data/GISData/loadscripts/insert_2010_Short_Counts.log 
psql -U nydot -d nywarehouse -v schema=nystaging,public -f ../Data/GISData/loadscripts/insert_counties.sql -L ../Data/GISData/loadscripts/insert_counties.log 
psql -U nydot -d nywarehouse -v schema=nystaging,public -f ../Data/GISData/loadscripts/insert_FHWAUrbanAreas2000.sql -L ../Data/GISData/loadscripts/insert_FHWAUrbanAreas2000.log 
psql -U nydot -d nywarehouse -v schema=nystaging,public -f ../Data/GISData/loadscripts/insert_MilepointRoute.sql -L ../Data/GISData/loadscripts/insert_MilepointRoute.log


Here is a screenshot of the script on my screen.


We can execute the script using the following psql command


$ ./insert_pgdata.sh

The script when running properly shows a bunch of INSERT statements as shown below.


Now that the data is loaded, we can view the same in uDig. If you don't have uDig installed on your machine, you can follow my post on uDig installation to set it up. The following screen shows us accessing the newly loaded datasets in uDig.


Now, we can see our data loaded in PostGIS.


That's it. We are done!

Setting the postgresql password for automated execution of scripts using psql


To execute batch files that execute psql, one needs to set the password. For security reasons, psql does not provide a command line switch to set the password. The recommended mechanism therefore in Linux is to set the password in the pgpass file.

I maintain a .pgpass file on my machine where I keep such passwords. Here is the way to edit and manage it.

First, open a terminal window and type the command to edit a file called .pgpass in your home folder.

$ gedit ~/.pgpass


Next, add lines to the file for the users you want to store passwords for. The format is

hostname:port:database:username:password

Here are the entries on my personal file.


Save the file, and you should be able to log in without the password, next time your pgpass file gets loaded.


That's it!

Monday, May 13, 2013

Adding an executable to PATH on Ubuntu


I needed to run the shp2pgsql command on my machine, for loading certain shape files I had downloaded from NYC GIS data clearing house, into a PostGIS instance. As I ran the shp2pgsql file to remind myself of the input parameters, I got the following error, essentially saying that PostGIS was not installed. This was incorrect, as I had recently installed PostGIS as documented in my previous posts here and fixed some environment issues here.

$shp2pgsql
The program 'shp2pgsql' is currently not installed. You can install it by typing:
sudo apt-get install postgis


Clearly, an issue with my path. I issued a find command to look for the actual installation folder.

$ find -name shp2pgsql

This located the file in its correct location.


Now, I checked my path.

$ echo $PATH

This showed that the shp2pgsql folder was definitely not in my path.


To add shp2pgsql to my path, I had to edit the .bashrc on my machine with the following command.

$ gedit ~/.bashrc


In the file, I added the an entry for appending the path to the executable to the existing system path variable.

PATH=$PATH:~/Work/Servers/PostGIS/postgis-2.0.2/loader
export PATH


Now I saved the file and closed it, and issued the following command on the terminal window, to reload the updated bashrc file into the environment.

$ source ~/.bashrc


Issuing the echo PATH command displayed the updated path, as shown below.


Now entering the shp2pgsql command displays the options for the tool.


Now we can go back to running the shp2pgsql command. This post walks through an example of loading some GIS data into PostGIS using the given command.


Sunday, May 5, 2013

Download and Install uDig


In this post, we are going to install uDig on our machine. uDig stands for User Friendly Desktop Internet GIS and is created by Refractions Research, the same company that develops PostGIS. To install, uDig on your Linux box, first access the followng site http://udig.refractions.net/download/. The page shows several options in terms of operating systems and platform architectures.


For me (64 bit Ubuntu), the correct option was Linux x86_64.zip. Click on Save as on Linux link for latest version. I created a folder called uDig where I downloaded the file.


You can choose a similar or same folder and Save the file. Its more than a 200 MB download and may take time based on your connection speed. Also go ahead and unzip the contents of the zip file in the folder.

Adding a link on the desktop

In this step, we will add a link to the uDig application on our desktop. The unzipped contents of the uDig installation contain a file called uDig.sh which is the one we will create a link for.

Right click on uDig.sh and select option "Make Link" as shown in the screenshot below.


This creates the a link for the uDig file as shown below. 


Now, we need to place this file on the desktop. Select the newly created file and drag the newly created link from its place to the desktop, as shown below.


Finally, I renamed the link to uDig and now clicking on the link will launch uDig from the underlying location. As expected, double clicking the newly created shortcut launches uDig.


That's it. We are done.


Saturday, May 4, 2013

Download and Install GeoMondrian


In this post we are going to walk through the steps for downloading and installing GeoMondrian. Geo-Mondrian is a spatially enabled version of Pentaho Analysis Services (Mondrian) and is available from the site http://www.spatialytics.org/projects/geomondrian/. Essentially it is what is called a Spatial OLAP Server or SOLAP.

The first step is to ofcourse navigate to this site.


The page indicates that GeoMondrian is available from the Spatialytics market. Accessing the link, the following screen was shown.


I added the software to my shopping cart and proceeded to checkout.


Selecting the checkout link displayed a screen where I had the option to sign in or continue as a Guest. I decided to continue as a guest.


I had to provide my email address for the site to send me a download link.


Accessing the link from my email, took me to the following page which then provided a link to download.


I downloaded the file and logged into my Tomcat administrator to deploy the file. To see how to enable administration on Tomcat, you can refer to my previous post on this topic.

The other option was to copy the web archive (.war) file to the webapps folder within Tomcat. I avoided that initially since it was a more cumbersome option.


Within Tomcat administration, I selected the option to deploy a new web archive. I selected the option to upload the geomondrian war file to the Tomcat instance.


Then I clicked on the button to deploy. I got the following error, essentially saying that the file was too big to be uploaded.


I tried looking for setting the default maximum value on the Tomcat instance by opening the server.xml file for editing.


In it, I updated the maximum file size restriction under the connector by setting the maxPostSize to 0 as shown below.


I restarted Tomcat, and tried the previous step but got the same error. Finally, I decided to go the old fashioned way of copying the web archive to the webapps folder.


I checked the Tomcat manager screen and the new context was created and the geomondrian application deployed.


Accessing the GeoMondrian url showed me the following link indicating that the application had been deployed.


In the next post, I will describe how to deploy and setup the GeoMondrian workbench.