Search This Blog

Saturday, December 15, 2012

Download and Install Open Source ESB (Apache ServiceMix)


In this post, we will download and install Apache ServiceMix . Apache ServiceMix is an open-source Enterprise Service Bus (ESB). It can be downloaded from http://servicemix.apache.org/


The download link is on the left, accessing it provides a list of several options. I downloaded the full version from the following.


Being a large file, I resorted to using wget to download the file using the command


To unzip the file, we can use the following command on the command prompt.

> tar -xvf apache-servicemix-full-4.4.2.tar.gz


Once installed, cd into the directory and execute as follows:

> cd apache-servicemix-4.4.2
> ./bin/servicemix


That's it! Apache Service Mix is now installed.

Friday, December 14, 2012

Install Community Dashboard Tools on Pentaho BI Server 4.5 Community Edition

Soon after installing and setting up Pentaho Community Edition on my box, I realized that it does not ship with a dashboard tool. That has to be installed from another project called CTools.

Downloading CTools

CTools is available at http://www.webdetails.pt/index.html#ctools. Once you access this URL, you will access the following page.

The page contains a link to download Ctools bundle. Accessing that link shows the following page on the Github site.


We can download the shell script and the README.txt file to our local folder. I must warn that saving the ctools-installer directly from the browser and right clicking, actually gave me the html of the current page, rather than the file. For downloading the file, I had to click the file, go into edit mode and copy-paste the contents to a local shell script file.

Anyways, I downloaded it to a folder called ctools under my Pentaho folder. The first thing is to make ctools executable. This is done by entering the following command on the command line in a terminal window.

> chmod a+x *.sh


The next thing we need to do is to run the installer with the correct parameters. This is done, as shown below.

> ./ctools-installer.sh -s pentahoServer/biserver-ce/pentaho-solutions -w pentahoServer/biserver-ce/tomcat/webapps/pentaho

On my machine, the above works out to the following.

> ./ctools-installer.sh -s ~/Work/Servers/Pentaho/biserver-ce/pentaho-solutions -w ~/Work/Servers/Pentaho/biserver-ce/tomcat/webapps/pentaho


Executing the above script, we can see that the script downloads the necessary files needed for the installation. The script prompts to replace several of the existing scripts that I accepted, as show below.


Once the prompts are through, the installation starts and finally it is done!


Now we need to start the embedded tomcat instance contained within Pentaho dashboard, and we can see that upon logging in as a user, we can access additional links for Community Dashboards (called CDB, CDV, CDE and CDC).


Accessing link for CDE (Community Dashboard Editor), the user can now define their own dashboards as shown below.


That's it. We have successfully installed Community Dashboards on Pentaho Community Edition. In the next post, we will see how to configure a dashboard.

Download and Install Pentaho Community Edition Installation on Ubuntu 12.04

In this post, we are going to install Pentaho Community Edition on a Ubuntu 12.04 Edition. Pentaho is an open source Business Intelligence server. Business Intelligence or BI, as many of readers might know, is a set of technologies to allow executives and operators make sense of the data collected within an organization. It typically tries to collate data from different transactional and operational systems into a specialized data model such that data can be sliced and diced, and aggregated and analyzed through visual and other means to derive actionable intelligence for business decisions.

The details on the Community edition are available at http://community.pentaho.com/projects/bi_platform/


The first step is obviously going to be to access and install the BI server.We can access the Community Edition by accessing the following URL. At the time of writing this post, the latest version available was 4.5, which is available from the following location.

http://sourceforge.net/projects/pentaho/files/Business%20Intelligence%20Server/4.5.0-stable/


Downloading the BI Server

To download this 450 MB file, it took a long time as I was travelling at the time, and did not have access to a high speed connection. After a few unsuccessful attempts, I resorted to using Linux's wget command to download the file.


After many hours on the slow connection, finally the download was complete.


Installation Steps

To install the file, navigate to the location where the file was downloaded and unzip the file.


The BI Server includes an Embedded Tomcat instance. We can navigate to the folder in a command window and start the Tomcat instance by entering the following command.

Next step is to make the shell files executable by entering the following command.

> chmod a+x *.sh


Next step is to ensure that the embeddable Tomcat server is executable. For, doing that navigate to the bin directory of the embedded Tomcat server and entering the command to make the shell files executable.

> cd tomcat/bin
> chmod a+x *.sh


Last but not the least, we need to make sure that the embedded Tomcat instance can execute on the defauly port. For this we need to edit and change the Tomcat port, that is configured in the ./tomcat/conf/server.xml file. Since I already have one Tomcat instance configured on port 8080, I needed to change the embedded Tomcat port to 8082.


Change the port to 8082 in the appropriate connector entry. Also, we may need to change the shutdown port, which is 8005 by default, to something like 8007.


Finally, we can save the file and close it. Now, we can go back start Pentaho server by entering the following command.

> ./start-pentaho.sh


Now, we can access the Pentaho BI Server on the browser by entering the url http://ub1204.arthgallo.com:8082/pentaho


Now, we can login by entering the following credentials.

Administrator login: joe/password


Entering the password, we can see the following home page for Pentaho BI Server


That's it, we have Pentaho Community Edition installed. By the way, I soon learnt that the Community Edition Pentaho does not ship with a Dashboard, which was the purpose of the whole exercise. That is available through an extension, setting up which I have described in the a future post (http://opendesignarch.blogspot.com/2012/12/install-community-dashboard-tools-on.html).

All the best!

Thursday, December 13, 2012

Adding a New User to ApacheDS using Apache Directory Studio


Adding a New User to ApacheDS using Apache Directory Studio


In this post, we will see how to add a new user to ApacheDS using Apache Directory Studio. Steps for installing ApacheDS and Apache Directory Studio were published in previous blogs. This is the link for Apache DS and here is the link for Apache Directory Studio.

Ensuring the LDAP service is running

Often, I find upon booting my machine does not startup by default. I am still trying to resolve that. Till then, first thing remains to make sure that ApacheDS is running in the background. We need to test this by entering the following command.

> sudo /etc/init.d/apacheds-1.5.7-default status


We can see that the server process is running. Next step is to launch the Apache Directory Studio and connect to the apacheds configuration we had defined earlier.

Connecting to Apache DS through Apache Directory Studio

In a previous post, I had walked through the steps to define a new connection using Apache Directory Studio. For this post, we assume that the previous configuration is already saved and we can connect using the saved connection configuration as shown below.


Next we would like to create a new user, by clicking on the DIT node and navigating to the ou=users node as shown below, and right clicking to select the New option from the contextual menu as shown below (Make sure to click the “New Entry” option and not the “New Context Entry” option.)


Choose the option to Use the Existing Entry as template as shown below and click on “Next”.


In the next screen, user will be prompted to enter one structural object class for creating the new user. Select inetOrgPerson as the object class as shown below.


Once selected, click on “Add” to add the object class to the list of selected object classes. Doing so, also adds other object classes from the inetOrgPerson object hierarchy as shown in the screen below.


Enter the following details to create a valid acccount as shown below.

Parent: ou=users,ou=system
uid = jdoe

and click on Next


Enter the following details.

cn : John Doe


Also, enter the value sn as Doe. You can edit the empty value fields by double clicking the empty value field. Don't click “Finish” yet as we have to do one more thing.

Creating the password for the New User

As mentioned, we need to enter one custom field. Click on the New Attribute button as shown in the screenshot below.


Clicking on the “New Attribute” word shows the list of attributes. Select, the attribute type as “userPassword”.


Clicking on “Next” brings the prompt to enter the language and locale for the field value. Choose the attribute value as “en-US” as shown below (or a different one, if applicable in your case).


Clicking on “Finish” brings the prompt to enter the field value. Enter a password value that is applicable as shown below.


Clicking on “OK” would bring the following list of attributes.


There we go, we have the user account created.


That's it!


Saturday, December 8, 2012

Configuring OpenSSO with ApacheDS LDAP on Ubuntu 12.04


Configuring OpenSSO with ApacheDS LDAP on Ubuntu 12.04

In the previous posts, we had installed OpenSSO on a Ubuntu 12.04 machine. In another posts, we had also installed ApacheDS LDAP as well as Apache Directory Studio to manage the LDAP instance.

In this post, we will configure the OpenSSO installation to authenticate against the Apache DS LDAP. We start by launching OpenSSO configuration screen, where we had left off at the end of the post on OpenSSO installation.

To be continued ....

Tuesday, December 4, 2012

Download and Install Apache Directory Studio on Ubuntu 12.04


In this post, I am going to walk step by step on how to install Apache Directory Studio. In my previous post, I had walked through the steps to install ApacheDS as a LDAP on Ubuntu http://opendesignarch.blogspot.com/2012/12/download-and-install-ldap-on-ubuntu.html

Now, to install Apache Directory Studio, you need to first access the site http://directory.apache.org/ to check for the latest release of the Studio.

You will see a screen as below


At the time of this post, version 1.5.3 was the most stable version available. To proceed, access the link for Apache Directory Studio 1.5.3 on the navigation pane on the left. You will see the following screen.


Click the link for downloading the Linux version.


For my machine, I chose the 64 bit version Linux x86_64. Once downloaded, I copied the installation to my software folder from my downloads folder.


Now, to install this open a terminal window and unzip the tar.gz file. In my case, the command is as follows

> tar -xvf ApacheDirectoryStudio-linux-x86_64-1.5.3.v20100330.tar.gz


This will unzip the contents as follows.


We can see that a new folder has been created with the unzipped contents. Not only that, it also contains an executable for the Studio program.


Let's go ahead and execute the application by entering the following.

> ./ApacheDirectoryStudio


Hitting enter show a splash screen for the program.


This will be followed by the directory studio loading with a blank screen.


The first step is to connect to an LDAP instance. In a previous post, I had walked through the steps for installing a LDAP server on your Ubuntu machine. Let's go ahead and connect to that LDAP server. To do so, click on the LDAP top level menu and click on menuitem “New Connection ,,,”


I entered the following details on my connection window

Name: apacheds (any random name that you can understand will do)
Hostname: ub1204.arthgallo.com (a fully qualified domain name I created by entering a dummy one in the /etc/hosts file)
Port: 10389 (This is the default port on which apacheds is installed.)
Encryption method: No encryption method


Clicking on button for “Check Network Parameter”, confirms that we have the right credentials.


Click OK to close the modal dialog, and click Next to enter credentials. Enter the following parameters in the next screen.

Authentication Method: Simple Authentication
Bind DN or user: uid=admin,ou=system (This is the default for a fresh apacheds install.)
Bind password: secret (This is the default for a fresh apacheds install.)

Click on the button “Check Authentication” to confirm if the parameters are entered correctly.

Great! Click OK to close the modal dialog and click on “Next” to get to the following screen.

It shows a screen, where you can enter additional details, but I did not change anything on this screen and moved ahead.


Finally, on the last screen, the Studio application prompts you to modify some preferences. Once again, I did not change anything.


Now, click Finish, and you should be able to see the following screen.
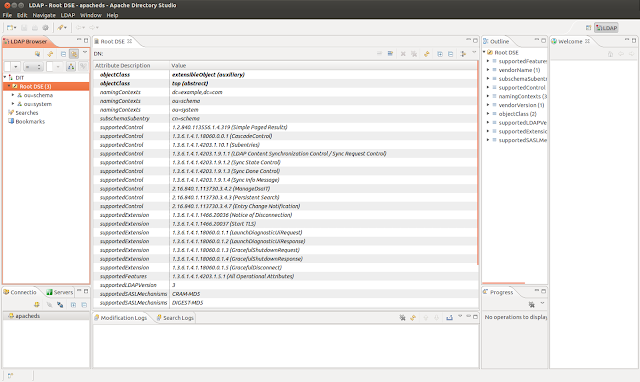

Now we can see our Directory server setup and correctly installed.


Next we will configure this environment. A few things we need to configure include setting up the password. In this step, we will change the password.

Click on the following nodes to expand the following sub-nodes on the tree control on the LDAP browser.

ROOT > ou=system > uid=admin

After selecting, uid=admin, you will be shown an attribute called userPassword.


Double-clicking the attribute, will open a dialog box where we can update the userPassword. First, we need to re-enter the old password (which was the word “secret” for the default installation).


Entering the default password, and clicking on “Verify” button, will show a dialog box as shown below.


Next, we need to enter the new password. For that click on the “Ok” button to go back to the Password Editor and click on the “New Password” tab.

Enter the new password, and if needed change the encryption method. I left the encryption method as the default “SHA”, but did enter a new password, as shown below.


That'sit! The password is now changed.


Now, we have configured our LDAP server and shown how to configure the default password.

Have fun!