Search This Blog

Showing posts with label Ubuntu. Show all posts

Sunday, October 16, 2016

Making space on boot for Ubuntu

Often we need to create space on the Ubuntu's boot partition. The offending files are older versions of Ubuntu, still sitting on the boot partition. Deleting old versions of Ubuntu is straightforward. Simply, run the following command and boot drive will be cleaned of the old versions.

sudo apt-get autoremove --purge

The above command will delete all, but the current and previous version in the boot partition, allowing you to load new updates of the OS.

However, sometimes deleting the old updates through the previous command is not enough. I ran across this myself when my software updater claimed that I needed to free up still more space. I found the following command on a blog that cleans out all but the current version. Use this only when the previous command is not adequate for your task..

dpkg -l 'linux-*' | sed '/^ii/!d;/'"$(uname -r | sed "s/\(.*\)-\([^0-9]\+\)/\1/")"'/d;s/^[^ ]* [^ ]* \([^ ]*\).*/\1/;/[0-9]/!d' | xargs sudo apt-get -y purge

This did the trick for me, and I was able to install the latest updates.


All the best!

Sunday, August 9, 2015

Reading dbf files in R

In this post, we will see how to load dbf tables in R.

First item is to install the appropriate R library. In this case, it happens to be a library called foreign.

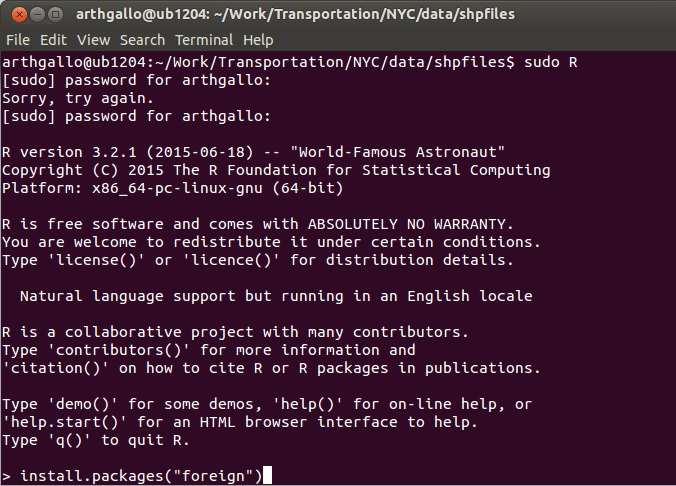
Run R in administrative mode so that library can be installed in the universal library

sudo R

> install.packages("foreign")


Quit R and re-enter R in non-administrative (non-sudo) mode

At, the R prompt, enter the following commands

 library(foreign)  
 fatal_yr <- read.dbf("~/Work/Transportation/NYC/data/shpfiles/fatality_yearly.dbf")  
 dim(fatal_yr)  


That's it, we have loaded the dbf file.


Saturday, July 25, 2015

Install Thrift on Ubuntu

Apache Thrift is a software project spanning a variety of programming languages and use cases. The goal is to make reliable, performant communication and data serialization across languages as efficient and seamless as possible.

Here are the steps to install thrift on your Ubuntu machine

$ sudo apt-get install libboost-dev libboost-test-dev libboost-program-options-dev libboost-system-dev libboost-filesystem-dev libevent-dev automake libtool flex bison pkg-config g++ libssl-dev


Next I created a folder where to download thrift as follows

$ cd ~/Work/Servers
$ mkdir thrift
$ cd thrift
$ wget http://apache.mirror.vexxhost.com/thrift/0.9.2/thrift-0.9.2.tar.gz


$ tar -xvzf thrift-0.9.2.tar.gz


Next we put the commands to build thrift

$ ./configure 

After configure, we need to make some minor changes to one of the files.

$ cd thrift-0.9.2
$ cd lib/cpp
$ gedit thrift.pc

Modify the following line to the version below

includedir=${prefix}/include
to
includedir=${prefix}/include/thrift


$ make 
$ sudo make install 
$ thrift --help 


Now that thrift is compiled, we need to make it accessible to all programs by entering the following command

$ sudo cp /usr/local/lib/libthrift-0.9.2.so /usr/lib/


Now thrift is installed

Tuesday, July 14, 2015

Upgrading R to latest version on Ubuntu

I am using a LTS version of Ubuntu on my machine so the R I was using was not the latest. You can check the installed version of R on your machine simply by typing the following command.

$ R

As you can see the version of R was 3.0.2, where as the latest version of R was 3.2.1


To update R, add your favourite cran mirror to your sources. Enter following command to access sources

$ sudo gedit /etc/apt/sources.list


Add the following line to the end of your file, For me it was the berkley mirror.

deb http://cran.cnr.berkeley.edu/bin/linux/ubuntu trusty/


Next, run the following commands, to obtain the key

$ gpg --keyserver keyserver.ubuntu.com --recv-key E084DAB9


Next we add the key to apt-key

$ gpg -a --export E084DAB9 | sudo apt-key add -


Next we run update, and install r-base

$ sudo apt-get update
$ sudo apt-get install r-base


Next, we can check the version of R to confirm


Yup, we have the latest version

Thursday, July 9, 2015

Install Sun/ Oracle JDK on Ubuntu

For certain programs, I needed to install Sun/ Oracle JDK on my machine. My default JDKs were different versions of IcedTea that would not suffice for what I needed to do (To setup IcedTea check my previous post). In this post, we would see how to install Sun/ Oracle JDK on Ubuntu

My way of checking it was to list contents links to java through the following command..

> sudo update-alternatives --list java


I also verified the contents of the /usr/lib/jvm folder to make sure I had not missed configuring a previously installed JDK.

> ls /usr/lib/jvm


As you can see, I don't see a Sun JDK installed, and I need to start from the beginning.

First step was to go to Oracle site for downloading the latest JDK (http://www.oracle.com/technetwork/java/javase/overview/index.html). Follow the links to the latest version and download it to your local machine.


Next, I copied the downloaded JDK installation file from my Downloads folder to my local folder ~/Work/Servers/jdk , where I created the following script in a shell file called install-jdk1.8.sh.

#!/bin/sh

tar -xvf jdk-8*
sudo mkdir /usr/lib/jvm
sudo mv ./jdk1.8* /usr/lib/jvm/jdk1.8.0-oracle
sudo update-alternatives --install "/usr/bin/java" "java" "/usr/lib/jvm/jdk1.8.0-oracle/bin/java" 1
sudo update-alternatives --install "/usr/bin/javac" "javac" "/usr/lib/jvm/jdk1.8.0-oracle/bin/javac" 1
sudo update-alternatives --install "/usr/bin/javaws" "javaws" "/usr/lib/jvm/jdk1.8.0-oracle/bin/javaws" 1
sudo chmod a+x /usr/bin/java
sudo chmod a+x /usr/bin/javac
sudo chmod a+x /usr/bin/javaws

Here is a syntax coloured screenshot of the script.


Next we make this script executable, and execute it.

> chmod a+x *.sh
>./install-jdk1.8.sh


Once the script has run, we can test the java version to confirm everything got setup correctly..

> java -version


If you see everything setup correctly, its great. If you still see an older version of JDK, use the update-alternatives command to set it up correctly by following these steps. Also, many softwares require an explicit JAVA_HOME to be set to execute correctly. This post on setting JAVA_HOME, shows how I have set it up on my machine.


Wednesday, February 25, 2015

Installing LibreOffice SDK on Ubuntu

I needed to write some small applications to export data from a spreadsheet into a script. Since I was using LibreOffice Calc, I started looking for a SDK. The information on the SDK can be found on this site.

http://api.libreoffice.org

which provides documentation and tutorials on the SDK.


However, there is a simpler way to install the SDK on your Ubuntu environment. That is using our familiar command sudo apt-get install ...

$ sudo apt-get install libreoffice-dev


This installs LibreOffice SDK on your machine. Next step was to configure everything. To do so, I had to first locate the installation, which can be done by searching for the following file (setsdkenv_unix.sh).

$ locate setsdkenv_unix.sh


Having found the location on your machine, you need to execute this as a source file using the syntax below.

$ . /usr/lib/libreoffice/sdk/setsdkenv_unix.sh

or

$ source /usr/lib/libreoffice/sdk/setsdkenv_unix.sh

This executes the environment to setup the application.


Now we are ready to run our programs.

Tuesday, February 17, 2015

Installing GeoServer 1.6.2 on Tomcat on Ubuntu

In this post, we will deploy GeoServer latest release on Tomcat on Ubuntu. The first thing to do is to download the installer by accessing the GeoServer website at http://www.geoserver.org/download/


Here we can choose to download the version we want. To deploy on Tomcat on my machine, I need to download the Web Archive (.war) version. Click on the link that says Web Archive. In case you also need to install Tomcat on your machine follow the steps in my earlier post on Installing Tomcat 7 on Ubuntu.


This downloads a zip file containing the .war file. Having downloaded it, we need to copy it to a place where we can extract it to unzip the contents.


On my machine the default Tomcat instance is deployed at /usr/share/tomcat7 and accessible at http://localhost:8080. We can launch a browser to verify its working.


Next I need to go to the Tomcat bin directory to check the Tomcat version. For that enter the following command

cd /usr/share/tomcat7/bin/

Then execute the following command

./version.sh

to check the version.


Next we need to copy the .war file from the place you extracted the zip file into the Tomcat 7 webapp folder. If you installed Tomcat using Ubuntu apt-get command, the webapps folder would be under /var/lib/tomvat7/webapps.

If you extracted the files at /tmp the command would be as follows

sudo cp /tmp/geoserver-2.6.1-war/geoserver.war /var/lib/tomcat7/webapps


You may be prompted for your password.


This deploys GeoServer on your local Tomcat instance that can be accessed by entering the following url on your machine

http://localhost:8080/geoserver


That's it. Thanks!

Monday, January 19, 2015

Installing Pentaho Business Analytics 5.2 Community Edition on Ubuntu


To download community edition, access the site http://community.pentaho.com. 


Click on the download section on the  page and access Community Edition 5.2 Business Analytics Platform.


Clicking on download, downloads a zip file. Extract the zip file to your folder of choice. It reveals a file called biserver-ce. I renamed my folder to biserver52-ce. Pentaho ships with a tomcat folder. I accessed the /bin directory and executed ./version.sh to check the version of Tomcat bundled.


I changed the standard ports to avoid conflicts with other Tomcat instances on my machine. I made the following changes in the /tomcat/conf/server.xml file.

http port: 8083
redirect port: 8449
shutdown port: 8008
ajp port: 8012


I saved the file and executed ./start-pentaho.sh in my pentaho root folder. This prompts a choice to acceptance automatic version updates. I agreed by pressing Enter and continued.


Accessing http://localhost:8083 launches the Pentaho login screen.


To assist in evaluation, Pentaho ships with an admin and a business user profile. These can be accessed by clicking the "Login as an Evaluator" button that displays the two profiles.


Clicking on "Go" on the admin profile, logs in as the administrator. You can see the admin logged in on the top right corner.


Signing out and logging in as "suzy" the business user logs you in with an end user profile.


That's it folks!

Monday, May 26, 2014

Installing Node.js on Ubuntu

In this post, we are going to see how to install Node.js (a server side Javscript engine) on Ubutntu. Installing Node.js on Ubuntu is straightforward.

Open a terminal window and enter the following command.

$ sudo apt-get install nodejs


The system will show a prompt to download and install the requisite binaries as follows.


After the installation is complete, open an editor and enter the code to create a small test programme. Our test programme will create an http server.

var http = require('http');
http.createServer(function (req, res) {
res.writeHead(200, {'Content-Type': 'text/plain'});
res.end('Hello World\n');
}).listen(1337, '127.0.0.1');
console.log('Server running at http://127.0.0.1:1337/');


Save the program (I saved mine as test_http.js), and open a terminal window and navigate to the place you have saved your test program. Now enter the following command.

$ nodejs test_http.js


That's it. Our test http server is running.

Now lets open a browser and enter the URL for the server.


There you have it folks. Our first test program with server side javascript with Node.js on Ubuntu.


Monday, March 10, 2014

Generating Poisson Distributed time events with R

In this example, I would like to generate a set of values that is based on a set of discrete arrivals. Poisson distribution is ideal for generating these random values. Lets say I want to generate a set of time events for cars arriving into an on-street parking next to a strip mall at a rate of average 2 to 3 per minute. Maximum arrivals are at 9:00 am. Total number of parking available is 10. If parking is available, a car parks for a mean of 45 minutes. If not, drivers look for additional parking around.

To start with, we can start arrivals at 6 AM till 10:00 PM. That is 16 hours. Also, let us assume an average of 3 cars per minute. To make sure, we can generate sub-minute arrivals, we need to convert everything to seconds. In this first attempt, we will ignore that arrival rate is time dependent and assume a homogeneous arrival rate through out the day. We will tackle inhomogeneous time-dependent arrival rates in a future post.

To generate these numbers, we can use the following formula

rate <- 3/60
period <- 16*60*60
start <- 6*60*60
cars <- runif(rpois(1,period*rate), min=start, max=start+period)


To see, how the data is distributed over time, we can see the individual arrivals per hour as a histogram with the following command.

> hist(cars, breaks=16)


To see arrivals per minute, we can use the following command.

> hist(cars, breaks=16*4)


To see the actual data generated, we can just type cars on the prompt to see the generated vector.


We will carry on from here...