This post is about downloading and
installing opentaps, a Java based Open Source ERP and CRM package built on top
of Apache Ofbiz. My post deploys Opentaps against a Postgresql database.
Getting the 1.5 installer directly
To download the installer for version
1.5, you need to access the download site at
http://sourceforge.net/projects/opentaps/files/opentaps%201.5/.
If one follows the website navigation, one ends erroneously on the
version 1.4 download page as of the time of writing this post. The
links on the website take one through a registration process and take
you to the version 1.4 download links. The link posted above will
take you to 1.5 directly.
If you actually wanted version 1.4 instead of 1.5
If you wanted version 1.4, then access
the download section of the opentaps website
(http://opentaps.org/products/download)
. This site presents a form that needs to be filled out with your
details to get to the download page.

Filling out the form presents the version 1.4 download link.

Continuing with 1.5 installation
I will continue this post with Opentaps version 1.5 installation that is started by accessing the link http://sourceforge.net/projects/opentaps/files/opentaps%201.5/. Once the user accesses the site, the download starts on the page as shown on the screenshot below.
Once I downloaded the zip file on my
browser's download folder, I copied it to a location on my machine
where I wanted to extract the zip.

Then opening a terminal window, I
unzipped the contents as shown below by entering the command.
$ cd Work/Servers/OpenTaps
$ unzip opentaps-1.5.0.zip

The above command extracts the contents of the zip file.
Verify Sun JDK is the default Java version
The next important item is to check the
java version installed on the machine by entering the following
command.
$ java -version
Luckily for me the Sun JDK showed up as
the configured version. If you get a different JDK installed as the
version, then you can follow these
steps to alter your configured version, and resume from here.

Setting up Postgresql environment
By default, Opentaps deploys with Derby
database. I wanted to setup my deployment with Postgresql, so I
followed the following steps. Assuming that you have Postgresql
installed on your machine, open a terminal window and enter the
following commands.
$ su postgres
$ createuser -W opentaps
System prompts you to enter the
password, which I entered as opentaps. Next, answer the following
questions.
Shall the new role be a superuser?
(y/n) n
Shall the new role be allowed to create
databases? (y/n) y
Shall the new role be allowed to create
more new roles? (y/n) y
Next we create the opentaps database
$ createdb opentaps
Here is my screenshot after running the
above commands.

Now exit as the postgres user and log
into psql as an opentaps user. Enter the following command (Note: You
should no longer be logged in as the postgres user but as the
original user you started the installation process with.)
$ psql -U opentaps -d opentaps

There! Our database user and database
is created correctly.
Next step is to configure opentaps to
connect to our new database as the opentaps database user.
Changing the database connections within opentaps to Postgresql
Changing the default database
connection to Postgresql involves the following steps. Open a new
terminal window and cd into the folder where opentaps 1.5 was
installed.
$ cd
Work/Servers/OpenTaps/opentaps-1.5.0/
$ cd framework/entity/config
$ gedit entityengine.xml
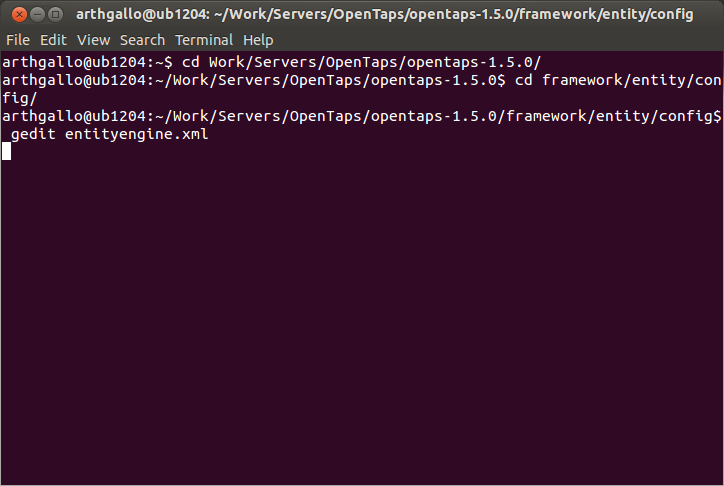
This launches the file in a text
editor. Make the following changes in your text file.
Under the default node, make changes to
change default datasource name from localderby to localpostnew, as
shown below.
Within the same node, make additional
changes for supporting multi-tenant model. Change datasource name for
localderbytenant to localpostnewtenant, as shown below.
Here is a screen shot of my gedit
screen after the changes.

This ensures that Now, navigate to
localpostnew entry in the file.
I set the username password for
postgresql connection
jdbc-driver="org.postgresql.Driver"
jdbc-uri="jdbc:postgresql://127.0.0.1/opentaps"
jdbc-username="opentaps"
jdbc-password="opentaps"
....

Now, copy the just edited localpostnew
connection, and paste it again in the file. Rename the datasourcename
to be localpostnewtenant as shown below.

Now that we have switched the default
database provider from derby to postgresql, we need to carry out an
additional step. By default the startup script for opentaps, would
look at a schema and if no database tables needed to run the software
are found, the installation program creates those tables. However,
the startup scripts do not create populate even the initial data such
as creating a login account for the administrator or an organization.
We need to ensure that the initialization scripts create these
datasets. To do so, we need to make a minor configuration entry to
load the sample data. This is explained in the following steps.
First, navigate to the opentaps
sub-folder from the installation root, by entering the following
command.
$ cd opentaps

Next, we need to open the
component-load.xml file for editing. I entered the following command
at the terminal prompt.
$ gedit component-load.xml

The file is loaded in the editor. This
is what the file looked like initially before I made any changes.

I made the following changes.
- Uncommented the line to load pentaho BI component
- Uncommented the line to load mycompany data
The modified file looks as follows:

Close and save the file and run ant
with run-install option. OpenTaps ships with its own version of ant
and that is the recommended version to be used.
$ ./ant run-install

Running this process took a little
while and in the end everything was compiled.

In my case, I also ended up changing
the default port from 8080 to 8084. In case you need to do the same,
you can follow the steps listed in my
post on the topic and resume back from here, once you are done.
Save and closing the files and running
./startofbiz.sh on the command prompt, starts the server in the
background. To see the action of the scripts, one has to enter the
following command on the terminal window
$ tail
-f runtime/logs/console.log

Entering http://localhost:8084/opentaps
produced the following screen on my machine.

The login details are:
Username: admin
Password: ofbiz

When I logged in for the first time,
the login did not work. Here is my post on fixing this problem. If
the login works, you should see the following screen.

By default, the admin user does not
have access to the CRM module. To view the CRM modules, login with
following credentials
Username: DemoSalesManager
password: crmsfa
This shows the following screen.

That's it, we have OpenTaps installed
and working.
No comments:
Post a Comment